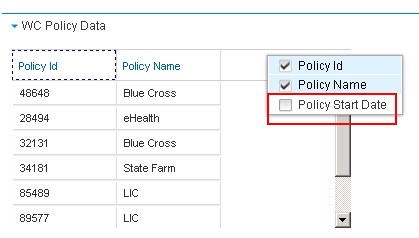
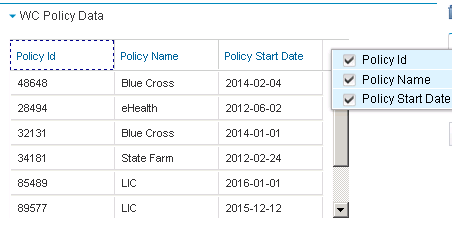
This post covers some basic tips and tricks when working with Dojo DataGrid (dojox.grid.DataGrid).
I shall explain and show snippet code on how to Show/Hide DataGrid columns, Resize column width and sort columns at runtime.
I shall explain and show snippet code on how to Show/Hide DataGrid columns, Resize column width and sort columns at runtime.
Windows explorer tool bar has the right click context menu using which we can show/hide folder and/or file properties(attributes). Similar behavior can be achieved with Dojo using dojox.grid.DataGrid. A dojox.widget.PlaceholderMenuItem has to be attached to a dijit.Menu and referred to by the DataGrid.
Resizing and sorting columns are relatively easier, there are modules under gridx.modules which need to be referenced in the DataGrid.
HTML code –wcDataPortal.html
<div class="claro" data-dojo-attach-point="WCMainDiv" >
 <div data-dojo-attach-point="policyDiv">
  <div data-dojo-attach-point="WCWidgetTitle" data-dojo-type="dijit/TitlePane" data-dojo-props="open:false" style="width:100%">
   <div data-dojo-type="dijit/layout/ContentPane" title="PolicyGridDiv" >
    <div data-dojo-attach-point="PolicyGridDiv" ></div>
   </div>
  </div>
 </div>
 <div data-dojo-type="dijit/Menu" data-dojo-attach-point="gridMenu" style="display: none;">
  <div data-dojo-type="dojox/widget/PlaceholderMenuItem" label="GridColumns"></div>
 </div>
</div>
Dojo snippet code –
define(["dojo/_base/declare",
        "dojo/dom-construct",
        "dojo/text!./templates/wcDataPortal.html",
        "dijit/registry",
        "dojo/request",
        "dojo/dom-style",
        "dojo/dom",
        "dojox/grid/DataGrid",
        "gridx/core/model/cache/Sync",
        "dojo/store/Memory",
        "dojo/data/ObjectStore",
        "gridx/modules/SingleSort",
        "gridx/modules/ColumnResizer”
    ],

    function(declare, domConstruct, template, registry, request, domStyle, dom,
        DataGrid, Sync, Memory, ObjectStore, SingleSort, ColumnResizer) {
        return declare("dojosample.pgwidget.wcDataPortal", [], {

            templateString: template,
            ……
            setPolicyGUI: function(customerID) {

                this.policyGridStructure = [{
                        name: "Policy Id",
                        field: "policyId",
                        width: "100px"
                    }, {
                        name: "Policy Name",
                        field: "policyName",
                        width: "100px"
                    }, {
                        name: "Policy Start Date",
                        field: "policyStartDate",
                        width: "100px",
                        hidden: true
                    }

                ];

                this.policyGrid = new DataGrid({
                    structure: this.policyGridStructure,
                    cacheClass: Sync,
                    style: {
                        width: "380px"
                    },
                    headerMenu: this.gridMenu,
                    modules: [SingleSort, ColumnResizer]
                });
                this.policyGrid.placeAt(this.PolicyGridDiv);
                this.policyGrid.resize({
                    h: 200
                });
                var policyObjectStore = new ObjectStore({
                    objectStore: this.policyGridStore
                });
                this.policyGrid.setStore(policyObjectStore);
                this.policyGrid.startup();
            }……
        });
    });
“headerMenu: this.gridMenu” – Assigns a Menu feature to the grid
“dojox/widget/PlaceholderMenuItem” – Shows the columns defined in
the dataGrid as checkbox items on the right click context menu.
the dataGrid as checkbox items on the right click context menu.
“modules: [SingleSort, ColumnResizer ]” – Sets up the dataGrid columns
with sorting and resize features.
with sorting and resize features.


Hi,
ReplyDeletevery interesting article. How do you use gridx in IBM Case Manager? How and where do you attach it? You're using this GridX (http://oria.github.io/gridx/index.html), am I right?