Wednesday, January 27, 2016

Accessing Case Information from within ICM Case Manager Widget Code

Requirement:
                ICM Case Manager widget developers often find the need to access Solution and/or Case information and its artifacts, to be able to make decisions and act upon them.
Solution:
               The solution involves accessing the cache object of the workItem object which gets passed onto a widget. From the cache object we can extract various artifacts like case ID, case name, Solution prefix, case properties and so on …
Sample Code:
// summary:
// Handler for receiving the event icm.SendWorkItem.
// payload: The received payload.
handleICM_SendWorkItemEvent: function(payload){
 if(!payload){
  console.log(" payload not received, returning");
  return;
 }
 console.log("Entering handleICM_SendWorkItemEvent ");
 
 // Defining a callback function 
 var callback = function(workitem) {

 var caseObject = workitem.getCase();
 if (caseObject != null) {
  caseObject.retrieveAttributes(lang.hitch(this, function(caseObj) {
  // get Case ID from case object
  var caseId = caseObj.caseIdentifier; 
      
  /* get CaseType object from case Editable. 
     This caseTypeObject has information about the 
     specific case type (and its artifacts) within a solution
  */
  var caseEditable = caseObj.createEditable()
  var caseTypeObject = caseEditable.getCaseType(); 
      
  // get Case Type name from caseTypeObject
  var caseType = caseTypeObject.name;
      
  // get solution prefix from caseTypeObject
  var prefix = caseTypeObject.solution.prefix;
      
  /* get Case properties using provider, symbolicName.Here provider 
     is F_CaseFolder which is the location where all 
     Case properties are saved.
  */
  var customerId=caseEditable.getProperty("F_CaseFolder",
      prefix+"_CustomerID").value;
     
  this.randomMethod(caseEditable, caseType, prefix, customerId);
  }));
 }
 };
 
 if (payload.workItemEditable) {
   payload.workItemEditable.
  retrieveCachedAttributes(lang.hitch(this, callback));
 }

}

Widgets can handle events like receiving case information, workitem and so on.
The above example code shows the method which handles one such event (SendWorkItemEvent). Callback and dojo functions are used to get the necessary information. Code has inline comments explaining things in detail.
Dojo DataGrid tips and tricks

This post covers some basic tips and tricks when working with Dojo DataGrid (dojox.grid.DataGrid).
I shall explain and show snippet code on how to Show/Hide DataGrid columns, Resize column width and sort columns at runtime.
Windows explorer tool bar has the right click context menu using which we can show/hide folder and/or file properties(attributes). Similar behavior can be achieved with Dojo using dojox.grid.DataGrid. A dojox.widget.PlaceholderMenuItem has to be attached to a dijit.Menu and referred to by the DataGrid.
Resizing and sorting columns are relatively easier, there are modules under gridx.modules which need to be referenced in the DataGrid.

HTML code –wcDataPortal.html

<div class="claro" data-dojo-attach-point="WCMainDiv" >
 <div data-dojo-attach-point="policyDiv">
  <div data-dojo-attach-point="WCWidgetTitle" data-dojo-type="dijit/TitlePane" data-dojo-props="open:false" style="width:100%">
   <div data-dojo-type="dijit/layout/ContentPane" title="PolicyGridDiv" >
    <div data-dojo-attach-point="PolicyGridDiv" ></div>
   </div>
  </div>
 </div>
 <div data-dojo-type="dijit/Menu" data-dojo-attach-point="gridMenu" style="display: none;">
  <div data-dojo-type="dojox/widget/PlaceholderMenuItem" label="GridColumns"></div>
 </div>
</div>

Dojo snippet code –
define(["dojo/_base/declare",
        "dojo/dom-construct",
        "dojo/text!./templates/wcDataPortal.html",
        "dijit/registry",
        "dojo/request",
        "dojo/dom-style",
        "dojo/dom",
        "dojox/grid/DataGrid",
        "gridx/core/model/cache/Sync",
        "dojo/store/Memory",
        "dojo/data/ObjectStore",
        "gridx/modules/SingleSort",
        "gridx/modules/ColumnResizer”
    ],

    function(declare, domConstruct, template, registry, request, domStyle, dom,
        DataGrid, Sync, Memory, ObjectStore, SingleSort, ColumnResizer) {
        return declare("dojosample.pgwidget.wcDataPortal", [], {

            templateString: template,
            ……
            setPolicyGUI: function(customerID) {

                this.policyGridStructure = [{
                        name: "Policy Id",
                        field: "policyId",
                        width: "100px"
                    }, {
                        name: "Policy Name",
                        field: "policyName",
                        width: "100px"
                    }, {
                        name: "Policy Start Date",
                        field: "policyStartDate",
                        width: "100px",
                        hidden: true
                    }

                ];

                this.policyGrid = new DataGrid({
                    structure: this.policyGridStructure,
                    cacheClass: Sync,
                    style: {
                        width: "380px"
                    },
                    headerMenu: this.gridMenu,
                    modules: [SingleSort, ColumnResizer]
                });
                this.policyGrid.placeAt(this.PolicyGridDiv);
                this.policyGrid.resize({
                    h: 200
                });
                var policyObjectStore = new ObjectStore({
                    objectStore: this.policyGridStore
                });
                this.policyGrid.setStore(policyObjectStore);
                this.policyGrid.startup();
            }……
        });
    });
headerMenu: this.gridMenu” – Assigns a Menu feature to the grid
dojox/widget/PlaceholderMenuItem” – Shows the columns defined in
the dataGrid as checkbox items on the right click context menu.
modules: [SingleSort, ColumnResizer ]” – Sets up the dataGrid columns
with sorting and resize features.


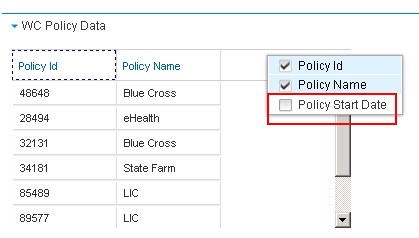
1
Column “Policy Start Date” is hidden by default


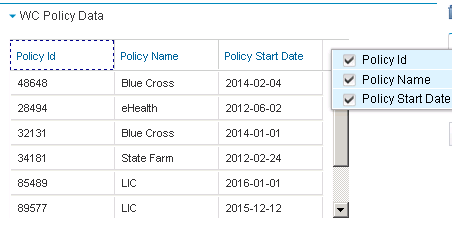
2
Column “Policy State Date” is shown upon enabling the checkbox on the right click context menu