Friday, December 2, 2016

Part 2 : Extensibility of IBM Content Navigator framework with plugins that suit your needs ...


Reason for this post ?? .. Well a client had a nagging UX with ICN search feature, and was looking for a solution.

Each of the 4-5 sub classes of a parent class had a unique choice list field. When a search is performed on the parent class (including the sub classes), the client had to add 4-5 columns in the Results Display to be able to view the choice list metadata of each subclass.
This wasn't an ideal UX, a better solution was to show all those unique choice list values from the various sub classes into one column, with a custom column header to indicate that they are from the choice list of the sub classes.

Below picture is probably worthier than the above 503 characters :D
Without Custom ICN Plugin

With all that being said, I obviously got it working else this blog would have been a moot point ;) .

Design:
1. Implement a ICN Response filter for "/p8/search"
2. Check if results display has more than one Sub type
3. Create a new column with a custom header (For eg: PlantSubType)
4. Loop through the search results, gather the choice list value from the subclass, and put it into the
       new column created (PlantSubType)
5. Remove the now redundant choice list metadata from the sub classes.

With Custom ICN Plugin


Key thing here is to understand the data being exchanged between client and server and figure out a way to manipulate it.

Snippets of JSON with and without the custom ICN plugin:


Introduce new Column


Copy data over into New Column

Code Snippet:
...  
...
JSONArray magazineColumnsArray = (JSONArray) jsonResponse.get("magazineColumns");
JSONObject magazineColumns = (JSONObject) magazineColumnsArray.get(1);
...
JSONArray listOfCells = (JSONArray) cellsArray.get(0);
JSONObject newCell = new JSONObject();
newCell.put("field", "PlantSubType");
newCell.put("name", "Plant Sub Type");
...
JSONArray tempAttribute;
for (int i = 0; i < rowsArray.size(); i++) {
...
   tempAttribute = (JSONArray) currRowAttributes.get("DesignType");
   currRowAttributes.put("PlantSubType", tempAttribute);
...
}


P.S:  "BUT", well there is always a "but" isn't it, the client didn't get to have this awesome piece of code, since we were out by then ... how about this for a sales pitch ;) ..
Friday, July 15, 2016

Extensibility of IBM Content Navigator framework with plugins that suit your needs ...

IBM Content Navigator is the goto webclient and face of various content management repositories, and thus caries a huge responsibility to meet the insatiable needs of user experience. 
ICN OOTB has rich UI modules and provides an Administrative desktop for non-developers to customize. 

Now getting onto the purpose of this post, ICN also provides a platform for developers to extend the UI by adding custom layouts, menus, actions, services, or even their own web application. 

I shall showcase 2 such cases - 

Wednesday, January 27, 2016

Accessing Case Information from within ICM Case Manager Widget Code

Requirement:
                ICM Case Manager widget developers often find the need to access Solution and/or Case information and its artifacts, to be able to make decisions and act upon them.
Solution:
               The solution involves accessing the cache object of the workItem object which gets passed onto a widget. From the cache object we can extract various artifacts like case ID, case name, Solution prefix, case properties and so on …
Sample Code:
// summary:
// Handler for receiving the event icm.SendWorkItem.
// payload: The received payload.
handleICM_SendWorkItemEvent: function(payload){
 if(!payload){
  console.log(" payload not received, returning");
  return;
 }
 console.log("Entering handleICM_SendWorkItemEvent ");
 
 // Defining a callback function 
 var callback = function(workitem) {

 var caseObject = workitem.getCase();
 if (caseObject != null) {
  caseObject.retrieveAttributes(lang.hitch(this, function(caseObj) {
  // get Case ID from case object
  var caseId = caseObj.caseIdentifier; 
      
  /* get CaseType object from case Editable. 
     This caseTypeObject has information about the 
     specific case type (and its artifacts) within a solution
  */
  var caseEditable = caseObj.createEditable()
  var caseTypeObject = caseEditable.getCaseType(); 
      
  // get Case Type name from caseTypeObject
  var caseType = caseTypeObject.name;
      
  // get solution prefix from caseTypeObject
  var prefix = caseTypeObject.solution.prefix;
      
  /* get Case properties using provider, symbolicName.Here provider 
     is F_CaseFolder which is the location where all 
     Case properties are saved.
  */
  var customerId=caseEditable.getProperty("F_CaseFolder",
      prefix+"_CustomerID").value;
     
  this.randomMethod(caseEditable, caseType, prefix, customerId);
  }));
 }
 };
 
 if (payload.workItemEditable) {
   payload.workItemEditable.
  retrieveCachedAttributes(lang.hitch(this, callback));
 }

}

Widgets can handle events like receiving case information, workitem and so on.
The above example code shows the method which handles one such event (SendWorkItemEvent). Callback and dojo functions are used to get the necessary information. Code has inline comments explaining things in detail.

Dojo DataGrid tips and tricks

This post covers some basic tips and tricks when working with Dojo DataGrid (dojox.grid.DataGrid).
I shall explain and show snippet code on how to Show/Hide DataGrid columns, Resize column width and sort columns at runtime.
Windows explorer tool bar has the right click context menu using which we can show/hide folder and/or file properties(attributes). Similar behavior can be achieved with Dojo using dojox.grid.DataGrid. A dojox.widget.PlaceholderMenuItem has to be attached to a dijit.Menu and referred to by the DataGrid.
Resizing and sorting columns are relatively easier, there are modules under gridx.modules which need to be referenced in the DataGrid.

HTML code –wcDataPortal.html

<div class="claro" data-dojo-attach-point="WCMainDiv" >
 <div data-dojo-attach-point="policyDiv">
  <div data-dojo-attach-point="WCWidgetTitle" data-dojo-type="dijit/TitlePane" data-dojo-props="open:false" style="width:100%">
   <div data-dojo-type="dijit/layout/ContentPane" title="PolicyGridDiv" >
    <div data-dojo-attach-point="PolicyGridDiv" ></div>
   </div>
  </div>
 </div>
 <div data-dojo-type="dijit/Menu" data-dojo-attach-point="gridMenu" style="display: none;">
  <div data-dojo-type="dojox/widget/PlaceholderMenuItem" label="GridColumns"></div>
 </div>
</div>

Dojo snippet code –
define(["dojo/_base/declare",
        "dojo/dom-construct",
        "dojo/text!./templates/wcDataPortal.html",
        "dijit/registry",
        "dojo/request",
        "dojo/dom-style",
        "dojo/dom",
        "dojox/grid/DataGrid",
        "gridx/core/model/cache/Sync",
        "dojo/store/Memory",
        "dojo/data/ObjectStore",
        "gridx/modules/SingleSort",
        "gridx/modules/ColumnResizer”
    ],

    function(declare, domConstruct, template, registry, request, domStyle, dom,
        DataGrid, Sync, Memory, ObjectStore, SingleSort, ColumnResizer) {
        return declare("dojosample.pgwidget.wcDataPortal", [], {

            templateString: template,
            ……
            setPolicyGUI: function(customerID) {

                this.policyGridStructure = [{
                        name: "Policy Id",
                        field: "policyId",
                        width: "100px"
                    }, {
                        name: "Policy Name",
                        field: "policyName",
                        width: "100px"
                    }, {
                        name: "Policy Start Date",
                        field: "policyStartDate",
                        width: "100px",
                        hidden: true
                    }

                ];

                this.policyGrid = new DataGrid({
                    structure: this.policyGridStructure,
                    cacheClass: Sync,
                    style: {
                        width: "380px"
                    },
                    headerMenu: this.gridMenu,
                    modules: [SingleSort, ColumnResizer]
                });
                this.policyGrid.placeAt(this.PolicyGridDiv);
                this.policyGrid.resize({
                    h: 200
                });
                var policyObjectStore = new ObjectStore({
                    objectStore: this.policyGridStore
                });
                this.policyGrid.setStore(policyObjectStore);
                this.policyGrid.startup();
            }……
        });
    });
headerMenu: this.gridMenu” – Assigns a Menu feature to the grid
dojox/widget/PlaceholderMenuItem” – Shows the columns defined in
the dataGrid as checkbox items on the right click context menu.
modules: [SingleSort, ColumnResizer ]” – Sets up the dataGrid columns
with sorting and resize features.


1
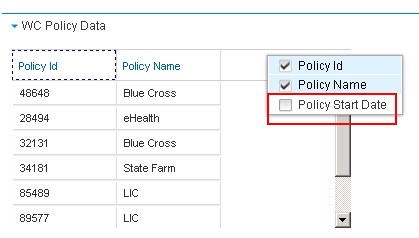
Column “Policy Start Date” is hidden by default


2
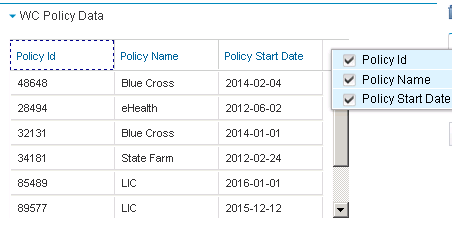
Column “Policy State Date” is shown upon enabling the checkbox on the right click context menu